accessibilitydemo
AI Accessibility Demo

This repository demonstrates how to use AI tools like GitHub Copilot to fix accessibility issues in web applications, moving from manual testing to full automation.
Flow: Manual discovery → Semi-AI fixes → Full-AI agent → CI validation
Prerequisites
- VS Code with GitHub Copilot
- Chrome/Edge browser
- Install these extensions:
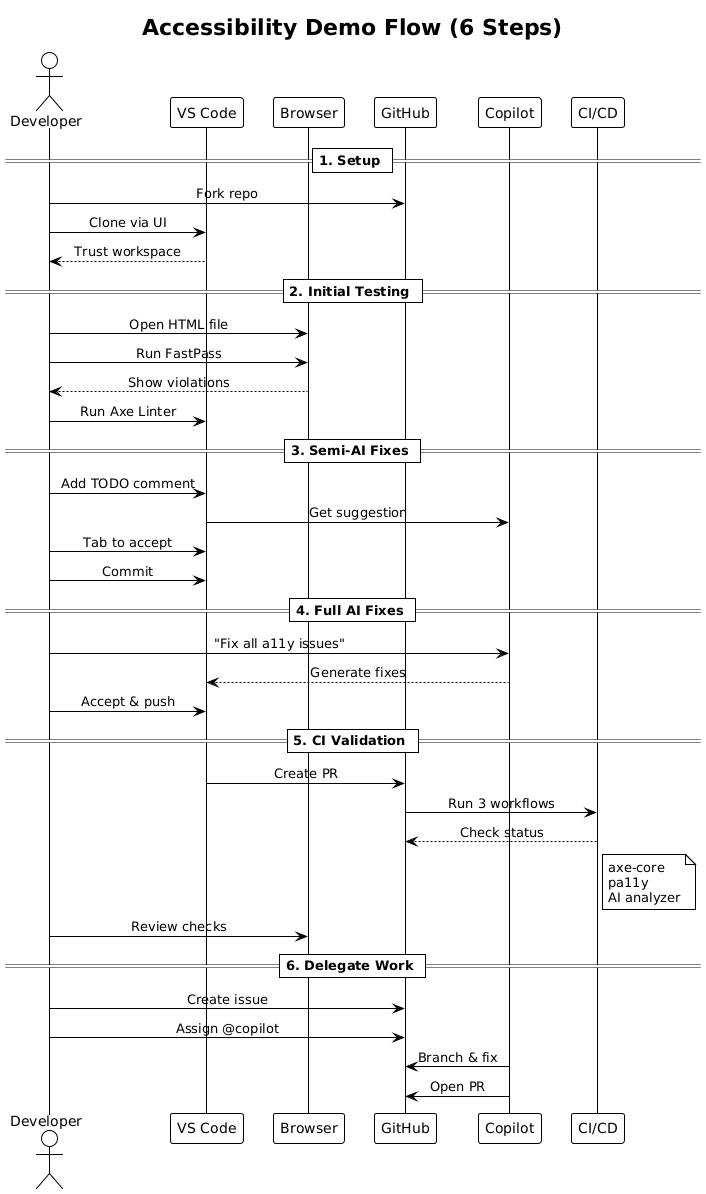
Complete Demo Flow
1. Setup (UI only)
- Fork the repository on GitHub
- In VS Code choose File → Clone Repository and paste the URL of your fork
- Open the workspace and choose Trust when prompted
2. Initial Testing - Accessibility Insights & Axe Linter
- Open
accessibility-issues-demo.htmlin Chrome/Edge - Click the Accessibility Insights for Web extension icon
- Run a FastPass to capture an automated + tab stops report
- In VS Code, check the Problems panel for Axe Linter issues
3. Semi-AI Fixes with Copilot Completions
- Add guiding comments like
<!-- TODO: add alt text -->and press Tab - Stage changes and commit through Source Control panel
4. Full AI Fixes with Copilot Agent
- Open Copilot Chat (Ctrl+Alt+I)
- Prompt:
Fix all accessibility issues in accessibility-issues-demo.html to meet WCAG 2.1 AA standards. Address color contrast, semantic structure, headings, labels, alt text, focus management, keyboard accessibility, and any other common accessibility problems. - Review → Accept → Commit & Push
5. Continuous Validation - GitHub Actions
- Three workflows run automatically on PR creation:
- accessibility-check.yml - axe-core testing with HTML reports
- pa11y.yml - similar to the above but open source rules engine
- ai_accessibility_check.yml - AI-powered analysis
5.1 (Optional): Enable Enhanced AI Analysis (needed for ai_accessibility_check.yml)
- Get a GitHub Models Token:
- Visit GitHub Models Marketplace
- Sign up for GitHub Models access
- Generate an API token
- Add Repository Secret:
- Go to your repository settings
- Navigate to Secrets and variables → Actions
- Click “New repository secret”
- Name:
MODELS_TOKEN - Value: Your GitHub Models API token
6. Delegating Future Work to Copilot Agent
- Enable Copilot agent access to work on all repositories
- Create a GitHub issue: “Implement keyboard-only navigation support”
- Assign issue to @copilot
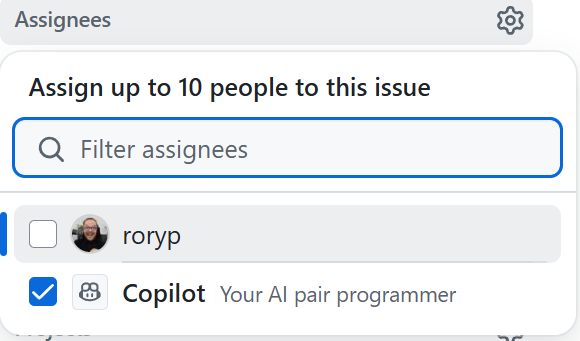
- The agent creates a branch, commits fixes, and opens a PR
What You’ll Learn
You’ll fix 13+ accessibility violations:
- ❌ Poor color contrast → ✅ WCAG compliant colors
- ❌ Missing alt text → ✅ Descriptive image labels
- ❌ Wrong heading order → ✅ Proper H1→H2→H3 hierarchy
- ❌ Unlabeled forms → ✅ Accessible form controls
Key Takeaways
| Stage | Tool | Interaction |
|---|---|---|
| Manual snapshot | Accessibility Insights FastPass | Browser extension |
| Real-time hints | Axe Linter | VS Code Problems panel |
| Semi-AI fixes | Copilot completions | Inline in VS Code |
| Full AI fix | Copilot coding agent | VS Code Chat |
| Safeguards | Three GitHub Actions | PR Checks tab |
Quick Testing
- Keyboard navigation: Tab through both HTML files
- Screen reader: Test with NVDA, JAWS, or VoiceOver
- Browser tools: Run Lighthouse accessibility audit
Resources
- WCAG 2.1 Guidelines - Target Level AA for best practice
- Copilot coding agent
- Accessibility Insights - Microsoft’s testing tools
Manual Testing with Axe
You can also run axe playwright accessibility tests manually using the included run-axe-tests.js script:
Prerequisites: Make sure Node.js dependencies are installed:
npm install
- Start a local server to serve the HTML files:
npx serve -p 3000 - Run the axe playwright accessibility tests (in a new terminal):
node run-axe-tests.js - Generate an HTML report comparing both demos:
node generate-report.js - View the report: Open
accessibility-report.htmlin your browser to see:- Side-by-side comparison of issues vs fixed demos
- Detailed violation descriptions and affected elements
- Specific recommendations for fixing each issue
The tests will output JSON results and show how many violations were found in each demo.
Note: The
requirements.txtfile is only needed if you want to run the Python-based AI accessibility analyzer script separately - currently run by the github actions workflow.
How the Initial HTML Test Files Were Created
@workspace create a simple html file to showcase how to fix accessibility issues. make the page deliberately non-accessible with a few issues. use plain html